

Photographed by Hazwan Hussain
When the night by, in my mind always think of that I would like to photograph "light trail". I live and work in Kulim, Kedah, to be quite difficult to find a good place for me to put my tripod and camera. To get rolling nice, I had to be at a relatively high (I always use the pedestrian bridge) to traffic a busy but smooth (it my opinion), then the most suitable and convenient for me to go is the pedestrian bridge Seberang Jaya, Penang . Located between the Shell and Caltex near Sunway Carnival shopping malls.
Setting Up Your Shot:
Photographing light trails is not difficult – it’s as simple as finding virtually any road with cars going down it once the sun goes down. But getting a shot that grabs attention means putting a little more thought into choosing your location, thinking about timing and framing your image. Here are a few tips on how to set your shot up:
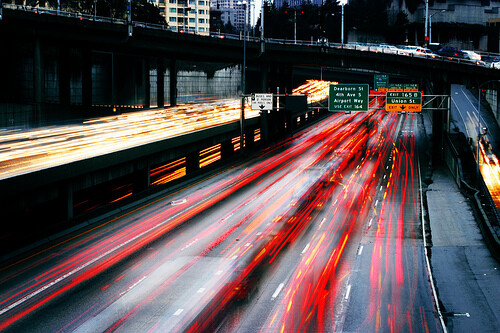
- Timing/Light – one might think that the middle of the night is the best time for light trail photography (and it can be) – however one very effective time to do it is just as the sun is going down (just before and after). If you shoot at this time you’ll not only capture light from cars, but ambient light in the sky which can add atmosphere to your shots. You also might find that earlier in the evening you get a little more ‘action’ in your shot with more cars and even the movement of people through your shot.
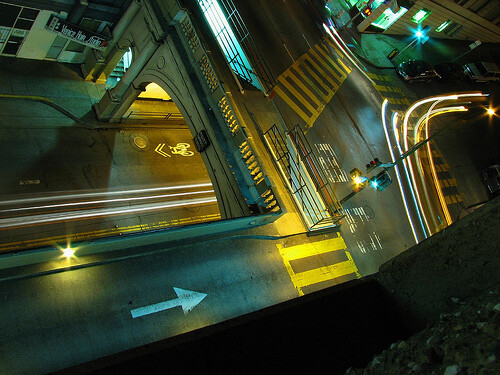
- Creative Perspectives – some of the most effective light trail shots that I’ve taken and seen from others were taken from perspectives other than at the height of a normal person standing up. Get down low or find a place looking down on your scene that will create an unusual angle.
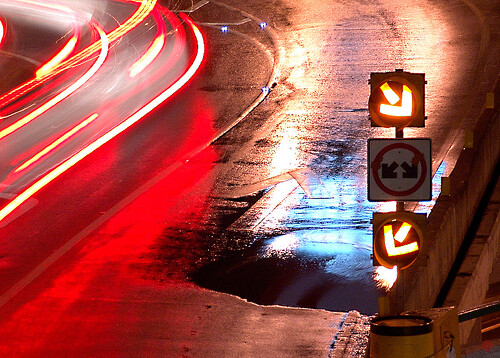
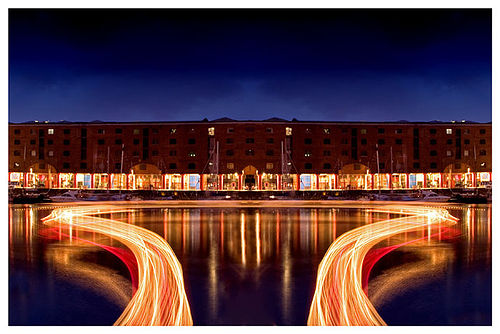
- Location – the most obvious thing with location is that you’ll need it to be somewhere near a road – however there’s more to think about than that. Choose a location that adds interest to the shot in some way. This might be one where there are well lit buildings along the road, one where multiple roads merge together to create light trails in different directions, on the bend of a road so that the trails sweep through the image, near a roundabout so the trails create circular shapes, in the middle of dual carriageways (on a triaffic island) so that you get traffic coming in two directions etc.
- Framing – the normal ‘rules’ of composition apply in this type of photography. Images need some sort of point/s of interest, the rule of thirds can be applied effectively, draw the eyes into your image using lines smartly, foregounds and backgrounds should add to and not distract from the image.
Settings:
- Aperture and Shutter Speed – I wish I could give you shutter speeds and apertures that will work in every situation – but as the ambient light and speed of cars will differ in every situation there’s no one exposure combination that will work in every setting.
Having said this I’ve found that I usually shoot at shutter speeds between 10 and 20 seconds (which gives cars time to move through the frame) and with apertures in the mid range (start with something around f/8).The key is to start with something in the range above and to take a few test shots to see how the exposure works. You’ll quickly realize whether your shots are under or overexposed and whether the length of the exposure is long enough to let cars travel through the frame in the way that you want.If your shots are overexposed – close your aperture down (increase the f stop number) or if your shots are underexposed open it up (decrease the f stop numbers). If you want the car’s lights to go further through the frame go for a longer shutter speed and if you want it to travel less through the frame shorten it.Keep in mind that aperture impacts depth of field. If you need to go with a larger aperture you decrease the depth of field and more of your shot will be out of focus.
- Histogram – One thing to watch out for is letting any light source in your image (whether it be headlights, street lights etc) washing out your image. Lights that burn too bright can cause distractions and draw the eye of your viewer away from focal points – ruining your shot. One way to quickly check out if there’s any area in your shot that is overexposed to this degree is to view the histogram on your shot. If there are areas that are blown out you’ll have a graph with a right hand side that is too high on the graph. Learn more about histograms here.
- Choose a low ISO setting - this will give you images with as little noise as possible.
- Shoot in RAW if you have it - this will enable you to have more control in your post production work – particularly in getting white balance right (something that can be important as you’re shooting in a situation with lots of artificial light that can cause all kinds of color casts in your shot).
- Manual Focus - In low light situations cameras can struggle to get focusing locked correctly. The last thing you want is for your camera to be in and out of focus just as you need to hit the shutter release. Switch to manual focus and make sure your focus is upon a part of your image that is visually strong.

Timing Your Shot:
There is no right or wrong way to time your shot. Hitting the shutter just before a car enters the frame and releasing it just after it leaves the frame can create a lovely unbroken line – but sometimes shooting with shorter exposure times while the camera is in the frame can be effective also. Once again it’s about experimenting with different timings and seeing what effects it has.
Using Bulb Mode:
Many digital cameras have a mode on them called ‘bulb’ mode that allows you as the photographer to keep the shutter open as long as you wish. This can be very handy in this type of photography to time your shots with precision. If you use this you’ll want to be using a remote shutter release to stop any camera movement while the shutter is open.
Read more: http://digital-photography-school.com/how-to-shoot-light-trails#ixzz0vqB8IPiv
Source : http://digital-photography-school.com

Comments
Post a Comment